Life Force
| a game by | Konami |
| Genres: | Flying, Shooting Games |
| Platform: |
|
| Editor Rating: | 7/10, based on 3 reviews, 5 reviews are shown |
| User Rating: | 5.3/10 - 6 votes |
| Rate this game: | |
| Updated: | Dec 10, 2025 |
| See also: | Arcade Games, Side Scrolling Games, Top Down Games, Shoot 'Em Up Games, High Score Games |
- Manufacturer: Komami
- Machine: NES
We were inundated with hints from all over on how to get 30 free ships in Life Force as soon as we printed our request for tips. A tip of our hat and $10 goes to Aaron Field and Brook Francisco (both of San Francisco, California) who first informed us that the "weapons" hint listed above for Gradius will also work to give 30 free lives in Life Force.
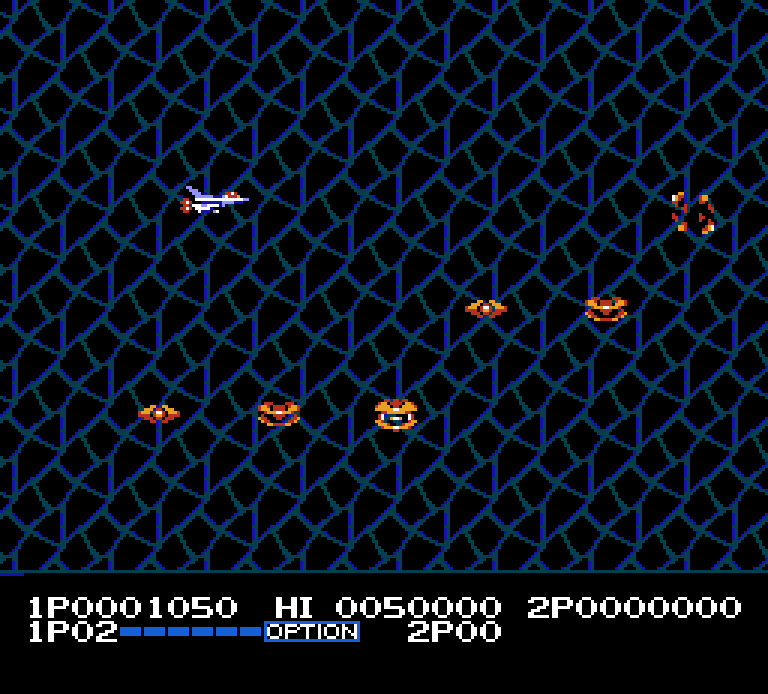
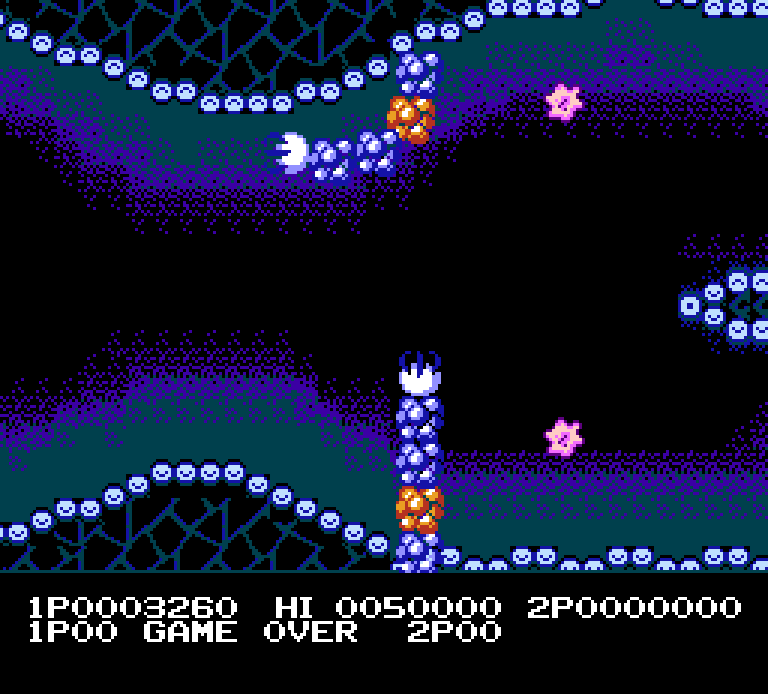
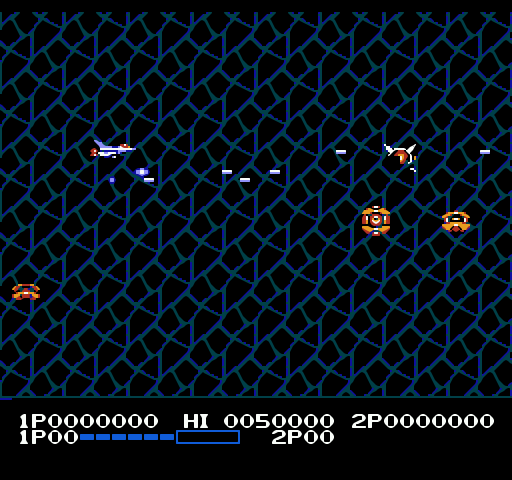
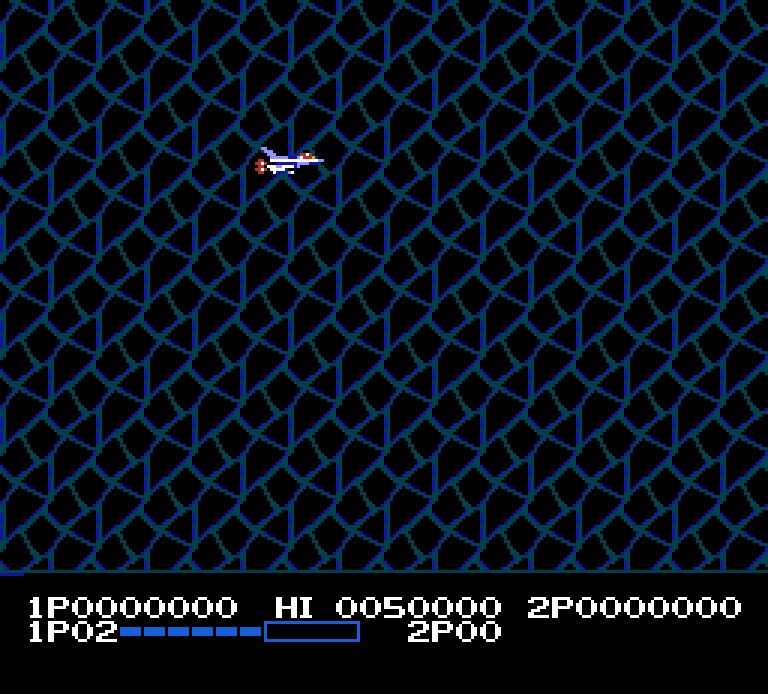
We also received a letter from Johnny Young from Red Boiling Springs, Tennessee, that included locations of two free lives in the first level of Life Force. In the photo at the top left, destroying the blob in the webbing leaves you with a power-up icon. Running over this icon gives you a free ship!
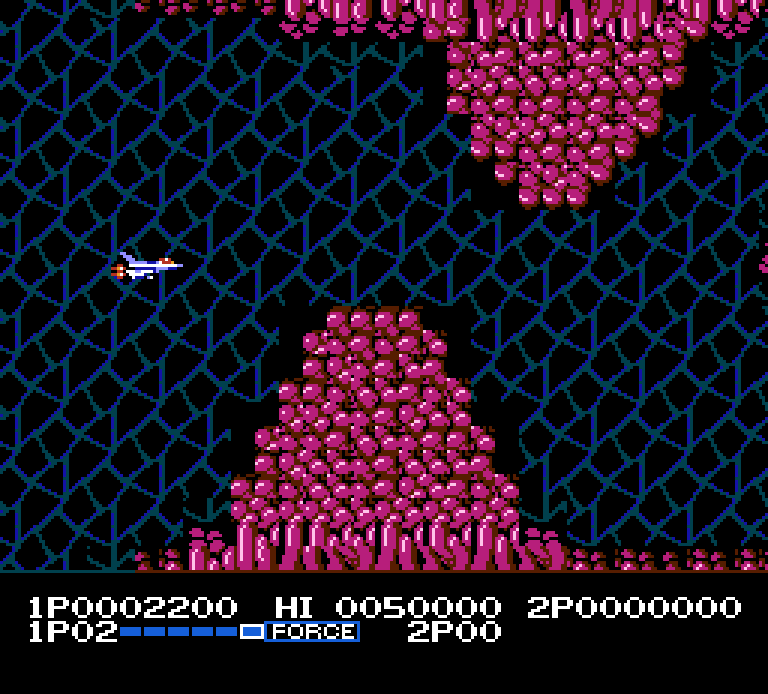
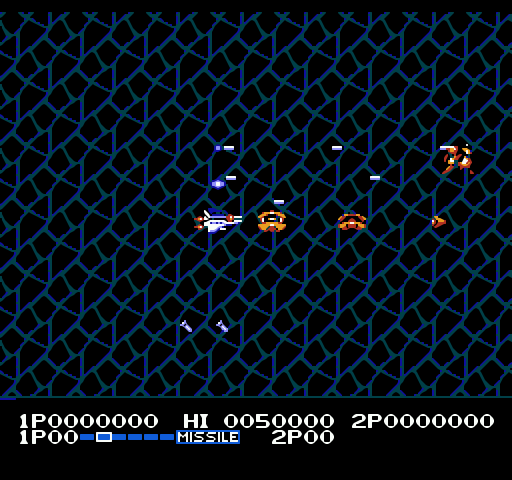
Similarly, cutting through the last red block just above the bottom edge of the screen (see photo at bottom right) will also reveal a free ship icon. We're sending some bucks your way, Johnny. Thanks!
Download Life Force
System requirements:
- PC compatible
- Operating systems: Windows 10/Windows 8/Windows 7/2000/Vista/WinXP
- P-200, 32 MB RAM
Game Reviews
- Manufacturer: Andy Eddy and Lee Pappas
- Theme: Strategy
In the February issue of forced VG&CE, we gave you maps and tips for making it through Levels 1 and 2 of Life Force by Konami. This +month we cover Levels 3 through 6 so you can complete this tough contest.
Don't just sit there and watch!
Before we get started with tips on Level 3, there's one hint we wanted to pass on to those engaged in team play:
The worst thing that can happen is one player losing all his lives and being forced to sit back to watch the other player finish their game. Konami has programmed a solution though it isn't documented. If the player whose lives are gone hits both the "A" and "B" buttons simultaneously, a trade will take place: one life will be taken from the surviving player and given to the idle player. This allows both combatants to keep active until all ships are destroyed.
The heat of battle - Level 3
Level 3, which has your ship(s) scrolling from left to right, begins the same way the first two levels did: with an opportunity to boost your options, which were likely taken down to zero by the Intruder at the end of Level 2. If you are unfamiliar with what we are talking about here, refer to Part One of the "Life Force Strategy Guide" in the February, 1989 issue of VG&CE. The power pods come when you blast away squadrons of Phoenix, similar to the saucers at the start of Level 1. Be careful, though, as the weaving pattern of these flaming birds can cause one to slip through your bullets and strike your ship.
After you get past the first six sets of birds, you'll see why this is called the "Prominence Stage". The top and bottom of the screen is lined with solar activity so don't stray too high or low, or you'll crash and burn. This flaring surface also serves to hide the appearance of beings flying out from the edges towards you.
This level is also sprinkled with single Phoenix: some get bigger as you shoot them, others turn into fast fireballs; all of them seem impossible to kill. The best strategy is to blast away at them as soon as you see them, but don't waste too much time and effort. Sometimes the best idea is to bypass a creature to save your life. If you do manage to rid yourself of one of these birds, though, you'll often be rewarded with a blue power pod. As we said in Part 1, a pod will clear the screen of all that is currently in your way.
The hardest objects to get past at this juncture are the "spitballs" that dance off the surface to the middle of the screen, often in pairs. You can blast them away - again, missiles will help you here - but they are so fast that it's difficult to quickly lock in on them.
Stay close to the center of the screen to increase the time you have to react.
Starting at point "A" is the worst threat to your survival: the solar flares. These flaming arcs start at the surface and curl a wide path through the air. They do their job in the wink of an eye and leave little space on the screen for your safety, but their impending presence is signaled with a small hill of flame on the surface. The flare will start here and then loop back to the left. The safest procedure is to locate your ship either to the right of the starting point, to the left of it (yes, inside the flare) or at the opposite edge of the screen from it. The first few flares come by themselves, but later you'll get groups of three, one after the other.
The rest of the level follows with combinations of what we've just described - more flares, mostly - and when you get past two more dragons, you're almost out. The solar surface will give way to a black screen, then you'll come face-to-face with "Cruiser Tetron". This lizard head is perhaps the easiest Mayor you'll face, but don't get too cocky. Simply dodge his puffs of fire breath and litter him with shots, and you'll find yourself on your way to Level 4.
No speed limit - Level 4
Okay, take a deep breath. Good, now let it out. While Level 4 can be taken as the one with the least opposition in it, it does have a section in it that will get your blood - as well as your onscreen ship-racing. When you hit point "B", put on your seat belt because you're going for a ride! The pace of the scrolling is upped to about three times the normal rate and the corridors are smaller. There are also a few globes spread out through the section, but they are hard to shoot, so don't bother with them.
The programmers have also spread power pods throughout this "racetrack", but many are against a wall. At this speed, you're better off grabbing at the ones that are in the open. You should also select a single Speed option, to make your ship more maneuverable, because the weaving pathway forces you to change direction frequently, lest you slam into a wall. Additionally, you should try to get Lasers; we'll tell you why in just a second.
Here are some hints: If you want to get the most power pods - some are grouped in threes - you should go to the right side at each fork. Also, it's wise to pause in this area frequently, glance at where you stand option-wise, and be ready to pick the option you want. At the speed you are traveling, it's nearly impossible to maneuver and watch your option display at the same time without careening out of control.
Do you know what that thing that hangs down in the back of your throat is? It's the uvula, in case you're ever asked again. After things slow down to normal, you'll see objects that look like that poking out from the sides. While it takes a lot of shots to destroy them, you're better off trying because if you leave them untouched, they explode and scatter indestructible silver disks in your path. The Lasers we advised you to get are the best weapon here, particularly if you get right up next to the bulb and fire.
The globes, marked on the maps as "C", have a weak spot that makes it easier for you to destroy them. If you stay to the far right of the globe's center, you'll be safe from the growing webwork. Don't feel that you have to get every globe, though.
The section that looks like a rib cage is not as hard as it looks, either. If you move off the bottom of the screen, you're susceptible to getting struck by the crossfire of beams that come out of the blinking blue and purple tips. Your main opposition comes from the bouncing horns. They can't be shot, but they are easily evaded by moving away from them until they hit the bottom and split into two, then slide over to where they first hit.
The last stage has you meeting the Mayor of Level 4, an ugly skull named Giga, whose eyes track your every movement. Basically, you have to adopt the same strategy as you did with Cruiser Tetron at the finish of Level 3. Watch out for Giga's eyes because they'll dislodge and move around the screen, and contact with either of them will destroy your ship - a likely conclusion, since they appear from off the screen when you least expect it.
Tough stuff - Level 5
The first challenge in a level is usually a tough one: in Level 5 a line of creatures (which we've marked as "D" on the maps) unfolds in your path like a curtain. To get past them, pick one specific row to shoot and you'll have a clear spot to cruise through when they come towards you. If you have Lasers, you'll be able to get rid of more aliens, leaving even more space to move. Lasers will also break loose some power pods when you come to the floating asteroids that follow.
Hint: Following this asteroid field, there will be some items that look like bouncing fuzz-balls. Do whatever you can to get rid of every one of them - otherwise they explode into a spray of fragments.
There comes a point, just before the end of Level 5, where you are confronted by three bobbing spaceships tossing glowing globes at you. If you take your time, you'll not only get them out of your way, but also grab a bunch of power pods. One rule, though: let the pods scroll to you, because this keeps the maximum distance between you and the opposing ships. Another hint: if you want to get a specific power-up button here, use the START button frequently to freeze the action. This makes assessing your situation much safer than in the heat of battle.
The Mayor of Level 5, Tutankhamanattack, starts off with a threat other than the standard firing - you'll have your eyeful of that soon enough! -because the framework around him falls apart when he makes his appearance. To stay alive, stick close to his head until some of the bricks on the left have fallen, then pick a lull to slide back to the left until all the bricks have dropped. Once Tut "comes to life", you'll have your work cut out for you! A circling ring of gold not only creates a shield around him, but also serves to obscure the shots he takes at you. He travels back and forth, so try to stay in the area with the most room to maneuver, so you can stay clear of the circling globes and Tut's shots. Take your time and you'll be on your way to completing your mission.
Homeward bound - Level 6
When the background turns green, you'll be in danger from spraying bullets coming from the sides. Missiles will, as always, be your best ally in this situation. If you don't have missiles, try to analyze the pattern to find safe spots in which to place your ship. We've found that staying close to the bottom of the screen is a good offensive position.
In a repeat performance, Gradius' Amkarkhand Heads are brought back to do battle with us. These statues can only be damaged when their mouths are open, but that's also the time that they fire dangerous rings at you. Staying close to the mouth, while more risky, enables you to get rid of them quickly (just as you did with the uvula-shaped objects in Level 4).
Watch out for the mixture of statues and the bullet spray that we just spoke of - a deadly combination. Finally, this is complicated even more by some heads moving from the edges of the screen and flipping face-up, making them impossible to shoot for a period.
After the heads comes the most important section. Here, you'll face a globe with a snake-like creature circling it. Just hang loose and blast at the snake, while avoiding the blue blobs he drops. When the snake is gone, the screen will start scrolling upwards again. Here's the important part: don't let the large globe move off the screen without blowing up the little, pulsing globe inside it. If it gets by you, upon your completion of Level 6, you'll be thrown back to Level 4 - not a very nice reward for all that work!
You'd think that after the main requirement for completing the game, you'd be done. Sorry, but no. First you have to negotiate one last section - perhaps the most difficult of all: piloting your craft through tiny spaces between pillars that seem to slam shut in front of you. At first, they leave plenty of clearance: but every once in a while, you have barely enough room to get by. The best strategy is to stay as far back as you can, so you can see where the opening is. To hamper that plan, one set of pillars close completely (which we've marked on the map for you, as point "E").
Successfully wending your way through Life Force rewards you with a distant view of Zelos imploding. At that time you'll be tossed back to Level 1 again, to try to better your score and do more damage to the forces of evil.
Good luck on your mission - and may the Life Force be with you!
This is a scrolling shooter video game developed and published by Konami was released in 1988. Game play is for one or two players simultaneously.
In some remote part of the universe, was born Zelos, an alien creature. As soon as he grew up he began eating away hundreds of galaxies, planets, and stars. Now your own planet has appeared on Zelos' way. It is your and your partner’s duty to fly and fight to save your world. There are six levels, which alternate between side and vertical scrolling. Each one is ending with a powerful guardian. Through the game, destroying certain enemies will release power-ups, which you can use to equip your ship with powerful weapons, extra speed, and shields.
This article will give you detailed maps and descriptions of the vital points in the first two levels of Life Force, a difficult yet winna-ble contest. In the next issue of VG&CE, we'll complete the Strategy Guide to cover maps and descriptions for the remaining levels.
Weaponry
Before we start tipping you off to improving your play in Life Force, we should familiarize you with the weapons you can get along the way. Certain enemies (or groups of enemies) will, when destroyed, leave behind a power pod. Each pod (designated by a white star with a red center) you snatch up will increment your Power-up display at the bottom of the screen, which shows what weapon is available to you at that time. There are six types of enhancements you can get, which are:
Speed---This makes your craft more maneuverable. Starting off with the default will be fine, but certain sections of the game require you to move quickly. Speed can be added as many times as you wish, but be careful: Too many Speed additions will likely cause you to over-control your ship, particularly in thin corridors where precise manipulation is needed.
Missile--When you select Missile, your craft will shoot projectiles out from the sides (one on each side) in addition to the normal firing out the front. The missiles are helpful in clearing out some of the "wall-hangers," objects that sit at the edges of the screen blasting bullets toward you. The missiles scan along the walls until they hit something or drop into a crevice. This power-up can be added a second time for missiles that move twice as fast.
Ripple--The "Ripple Laser" alters your firing pattern from standard bullets to expanding rings of laser fire. When you sit at the far left in odd-numbered levels or at the bottom of the screen on even-numbered levels, the ripple will take out quite a sizable row of oncoming aliens. Ripple is very helpful if there is a lot in your path, in addition to being more powerful than the normal weapon you start with.
Laser--The "Plutonic Laser" that's added with this power-up will cut through most anything quicker than any other weapon. It also doesn't appear to stop once it hits something--a row of beings can be whipped with one single ray. Furthermore, the laser follows the movements of your ship, so you can pull the trigger and steer the beam across the playfield to wipe out a large path of enemy creatures. The Laser power-up can be selected twice for added power.
Option--At first the Option power-up will only seem to append a small, pulsing spot of light to the side of your ship--that is, until you hit the fire button. At that point you'll realize that a "Ghost Ship" of your craft's firing ability has been added to your ship. If you have Lasers, you'll now have two beams; if you have missiles, they'll be duplicated. This can be added twice, but if you are playing in two-player mode, a total of two Options can be added: either two for one of the players or one for each player.
Force--Last on the list is a Force Field, offering protection to certain obstacles in your way. I've never put that much faith in Force's unpredictable shielding power, but instead use my power-ups to build up my weapon cache. In other words, you can't tell when you're safe and when you're not. Also, unlike Life Force's prequel, Gradius, you can't tell when your shields are on their last legs; Gradius would glow the shields red when they were able to take one more hit.
Weapons note: You can load up on weapons, to make an extremely powerful destroyer out of your rocket. Only two weapons are in conflict with each other: Ripple and Laser. If you pick one while using the other, the last one chosen will be your weapon of choice.
One more tip: The "ghosts" that are given with Option have a curious quirk: When an Option-equipped ship is hit and destroyed, the little ghosts will cut loose and start moving back toward the screen edge you just came from (the left of the screen on odd levels; the bottom on even levels). If you (or your partner, in team play) intercept the ghosts, you'll reacquire that power-up even though the remainder of the weaponry will be lost by the ship's destruction. If they leave the screen before they are intercepted, you'll need to power-up with Option again to get them back.
Level 1
I've learned one key to success that I'll pass on: Don't get greedy. Trying to make that last shot to give you another power-up is almost a sure way to run into something and lose a ship. The enemies that look like flying saucers at the start of the game are spaced so you'll try to get every set of saucers, and every single power-up you can. You should skip a power pod if there's the risk of losing a ship. In addition, you can only replace a ship at certain point intervals, where you can power-up all throughout the game. Safety comes first.
You'll find out that, as little as they cost in powerups, missiles are incredibly valuable. A lot of the action takes place along the surface--either because the programmers placed annoying rocket launchers and such or as a location for power-ups--so the surface-strafing missiles will do a lot of the dirty work for you. A good sample of the missile's effectiveness is the area marked "A." Here, just before the web, you'll face little white strings that move from the edges to the middle. If you have missiles, they will wipe the strings out before they have a chance to dislodge and threaten you. Otherwise you should move as close to the right as you can, making sure to keep the fire button down to cut a path through the web. This is because the strings can only move straight down or to the left, but not to the right! Safe havens are great when you can find them.
Here's a tip about the blue and white blobs that are stuck in the web: Initially it appears that they are indestructible, but multiple shots will dispose of them. Following the webs, there will be another set of white strings, but you can't use the same strategy because of the expanding landscape that slows your progress. The best thing to do is hang back, staying close to the web, and blast the strings through the opening between the new peaks, then carefully wend your way through the space.
The last section of the first level is marked with an "B." After blasting the arm that blocks your path, you'll face a big square in the center, with paths to the top and bottom. It's dangerous to take the paths unless you still have a sizable cache of weapons. Missiles will clear out the rocket launchers on the surface, and the starfishshaped object will leave a power pod behind. There isn't much room for evasive action, so be careful.
If you opt to go through the square, you should stay as close to the right edge of the swatch you are cutting away as possible. After you make it past the first block, the next two landmasses must be handled the same way, except that these cover the screen, top to bottom, and require you to shoot through them.
Last in this level is a weird brain-creature, which the makers of the game call Golem. It's the only thing that stands between you and Level 2. To defeat him/her/it, you need to shoot it in the eye many times. Unfortunately the eye isn't revealed right away, so you have to do some stalling first.
It's a Blast--Level 2
Level 2 doesn't throw that much out of the ordinary at you, but it does keep you busy. There are so many things on the sidewalls that you'll have a hard time staying in one piece. For this reason, Missile power should be one of the first power-ups you get.
If you didn't have a powerful ship after Level 1, then the beginning of Level 2 should help you with its multiple power pods. Did I already say not to get too greedy? Well don't!
Level 2 will also introduce you to a different type of power pod, one with a blue center rather than a red one. The first pod of this sort shows up when you see two rows of saucers zigzagging down the screen, noted on the maps as "G" The group on the left, when destroyed, will leave the blue pod. When you contact one of these pods, everything on the screen blows up. Wait as long as you can, until a bunch of enemies is on the screen, then touch the pod to wipe them out. If your timing is good, you'll be able to claim some power pods this way.
The main frustration you'll face in this level, aside from the constant pressure, is with the boulder launchers. There are a few of them, and they're marked as "D" on the map. To make things more difficult, this stone
1) Try to time the cycles of when groups of boulders are spit out, then dance be-tween/through/around them, blasting as many out of your path as possible, while you move to safety at the top of the screen; or,
2) Eliminate the flow of boulders by destroying the base that is tossing them out, while staying clear of any rocks that are curling your way.
Aside from keeping missiles as one of your weapons of choice, you should try to go for Ripple, as well as building up a few Speed levels. The main reasons for using Ripple has to do with its expanding beam clearing a bigger path in front of you, not only for most of Level 2, but also for the section labeled "E." This big block contains power-ups throughout various parts of it. Ripple, especially if your ship is enhanced with Option, lets you cut a large path out of the block, loosening up multiple power-ups. Take maximum care not to whomp into the wall created by your blasting, an easy mishap if you aren't concentrating on where your ship is. Remember: Don't get greedy, but you knew that, didn't you?
Missiles are crucial to survival, though, there is a chance of getting out alive if you clear one wall with bullets, then work on the other wall in the same manner. Watch out for the three rocket launchers on each wall.
The level 2 Boss, Intruder, can only be damaged by hitting it at its core, the open row that leads up to the blue jewel in the center. What open row, you ask? Well, you need to poke through the three doors that block the jewel, then unleash a torrent of shots to the jewel itself.
Sounds easy, doesn't it? Forget easy, the Intruder moves around in a circle, making it hard to aim quality shots at its center. But the toughest part is avoiding the pinwheeling arms, which by the way, grow and speed up over time. If you didn't build up your weaponry or got killed in the marble room, it will take a long time to kill the Intruder. Lastly, if you didn't build up Speed levels, you'll have a hard time avoiding the arms also.
The bottom left corner appears to be a safe place to hide for a few rotations--the arms can't reach you there until about the ninth rotation. The best way to get the most shots in is by following the rotation of the arms around the Intruder; if you can't because you don't have enough Speed, you'll definitely lose at least one ship, perhaps more, to its grasp. All you can do is plug away, and then it's on to Level 3.
Yes, we're going to keep you in suspense until the next issue, when VG&CE will complete the mapping and hints for finishing Life Force's last four levels.
Designed as a sequel to their popular Gradius cartridge, Life Force pits you against an evil Deltoid monster named Zelos. Obviously sporting a ravenous appetite, these critters have the ability to munch on entire planets, even galaxies, for lunch, and still have room left for dessert. Unfortunately, the Vic Viper (your battle cruiser) and, if you choose to play with two players, the Road British Space Destroyer, fit Zelos' bill as after-dinner mints.
To be successful in your mission against Zelos, you need to keep your craft at their peak. When you destroy certain enemy craft, power pods are released that let you upgrade your ship's capabilities with a tap on the "A" button. These "power-up" enhancements include better maneuverability, powerful lasers and protective shields.
Believe me, you'll need each and every enhancement you can get your hands on. The path you travel covers six different worlds, each with a bevy of dastardly attackers. Couple this constant, unceasing onslaught with a series of indestructable road blocks-- such as floating space debris or quick-as-a-wink solar flares--and you'll have your hands full.
A positive feature is the two-player mode. Rather than the "alternating play" situation that you'll find in many game cartridges, Life Force lets you team up on the mission in a cooperative strategy. This makes it easier for the struggling player to be assisted by his partner, who may be better off as far as weapons go. Aside from that, there's the lessening of the boredom for each player, as you don't have to sit idly by waiting for the first player to be killed off before playing yourself. Each world ends with a "Mayor," the toughest obstacles you will face, and each one varies from area to area. Defeating the area mayor will warp you to the next section for more of the same type of battle.
Konami is to be commended for making alterations to the graphic components, such as backgrounds and enemies, as well as alternating the playfield from horizontally-based to vertically-based, and back again. This not only keeps you on your toes from a control standpoint, but also prevents the game from getting stale.
This brings us up to an important point, though: Life Force may just be too difficult for most gamers. For example, there is a segment of Level 4 where the game speeds up two or three times faster than the normal rate. Couple this with constricted corridors in which to maneuver, and your trek appears a nearly hopeless cause.
The only other major complaint I can make about Life Force has to do with the graphic enhancements I spoke of previously. With all the explosions, laser rays, aliens and whatnot dispersed across the screen, any extraneous distractions can be detrimental to successful game play and overall enjoyment. Unfortunately, for the most part, the colorful backgrounds become a distraction in many places. On the whole, Life Force will provide lots of entertaining hours of play for you. Better yet, invite one of your joystick jockey friends over for a night of cooperative alien bashing. There's plenty of opportunity for that in this game.
Snapshots and Media
NES/Famicom/Dendy Screenshots