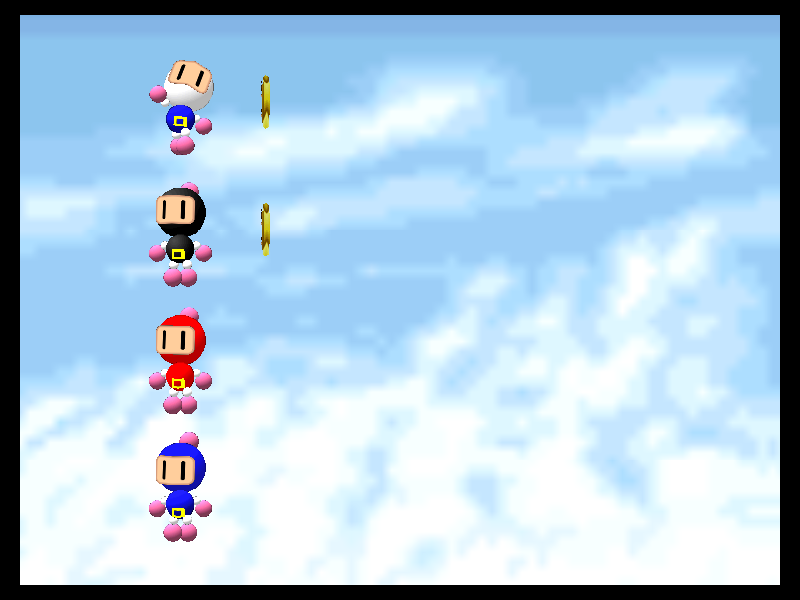
Bomberman 64

| a game by | Nintendo, and Hudson Soft |
| Genre: | Action |
| Platform: |
|
| Editor Rating: | 8/10, based on 10 reviews, 12 reviews are shown |
| User Rating: | 9.7/10 - 7 votes |
| Rate this game: | |
| Updated: | Nov 12, 2025 |
| See also: | Action Games, Arcade Games, Old School Games, Bomberman Games |

Hudson's old explosive title (pun intended) returns for a new round of destruction on the N64. But this time player gets more than what they would expect from a typical Bomberman title. There are two distinctly different forms of games to enjoy packaged in one cart. There is the typical multiple player-style title where the object is to blow the other competitors into oblivion with proper application of skill and timing. But new to this release is the latest adventure where the player controls the Bomberman character in a Mario 64-style 3-D adventure game.
Although this may take many players by surprise, they have to remember that this version is in addition to the classic confrontational mazed stages. So now. Bomberman fans as well as the enthusiasts of the newest style N64 3-D titles, that have become so popular in recent months, may have the chance to play this title as a US release. Whether this one will live up to the title's past reputation, only time will tell.
- MANUFACTURER - TBA
- THEME - ACTION
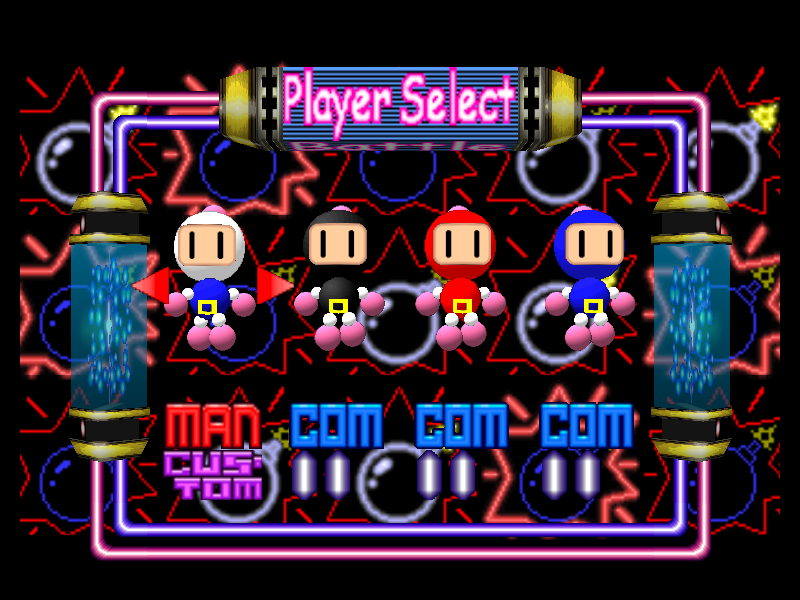
- NUMBER OF PLAYERS - 1-4
Download Bomberman 64
System requirements:
- PC compatible
- Operating systems: Windows 10/Windows 8/Windows 7/2000/Vista/WinXP
Game Reviews
There's no mistaking Bomberman when you see him. He's the little guy with a helmet on his head and a bomb in his hand. He's made the rounds (on a whole slew of systems) and now he's coming to the Nintendo 64.
The Story Mode is similar On a sense) to the old games, but now with 3-D graphics and other surprises. The big differences come in the multiplayer game--it has a whole new feel compared to the old ones. In Bomberman 64 the arena can be on different levels. Players can throw bombs up or down stairs, over ledges and plenty of other places. Plus, instead of the bombs just being laid down and then exploding outward in a straight line, they explode with a 3-D blast area (kind of a sphere like in Poy Poy for the PS). This simplifies what the game is about, but as more info comes in, we'll pass it along.
In this age of advanced technology, it's inevitable that all classic games get a 3-D treatment for their sequels and updates, Bomberman is no exception.
Bomberman 64 takes bold steps Ir new directions. First, everything is in full 3-D with full freedom of movement. You view everything from an overhead perspective. The one-player game takes advantage of this new, open feel by creating a big adventure game out of it. The worlds aren't huge, but you'll get to explore several landscapes as you progress toward the formidable Bosses. Along the way, you'll learn all the new moves available to a Bomberman in a new and strange 3-D world.
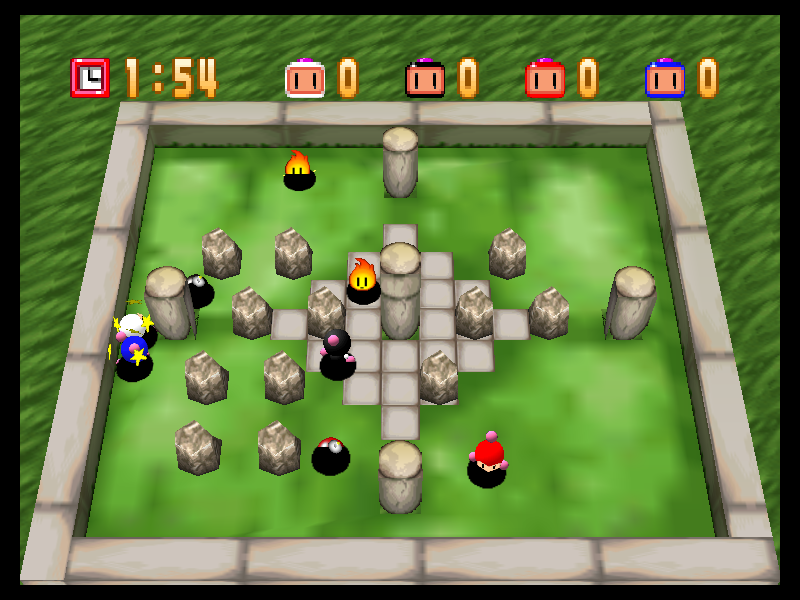
Anyone can tell you, Bomberman isn't famous for its one-player games. It's the Multiplayer Mode that puts every version of Bomberman (from the NES to the Saturn) on the map of success. The gameplay of B64, however, deviates from the past 2-D Bombermans. Battles take place in more open arenas. You won't find any rigid stages laid out in a grid pattern any more. Since everything isn't 2-D and in squares, the explosions are now round (instead of plus-sign shaped).
If that wasn't enough, Hudson has introduced a few new moves that adds a new level of strategy to the series. For example, you can pick up dizzy enemies and toss them into precarious situations (if you've ever played Konami's Poy Poy for the PlayStation, you'd have a good idea how Bomberman 64 plays). When you die, B64 resurrects you as a ghost, to annoy and retaliate. Ghosts can knock bombs around and jump on other living players, messing up their controls for a short period of time.
Perhaps it's long overdue that Hudson changed the look and gameplay of a series that has basically stayed the same for years. But as the saying goes, "If ain't broke, don't fix it," Was it wise for Hudson to change such a traditional and successful formula? Watch for the full review in an upcoming issue of EGM.
People say:
I have mixed feelings about Bomberman 64. I like it, but I think I do for the wrong reasons. I mean, the One-player Mode is better than the Multiplayer Modes! This can't be right...can it? It's a weird situation. As a regular old one-player game, it's a lot of fun with plenty to offer. The graphics are simple, but still pretty nice (especially those reflections on water), and the music is great. One of the main things about the game that really rubs me the wrong way is the awkward camera positioning. Sure, the camera is fully adjustable, but even with that, certain tight areas make it impossible to get a really good angle on what you're doing--or more important, who's about to hit you or if you're about to fall to your death. Since the game is one of action and exploration, I think it's important to have a nice view of where you're exploring. OK, now on to what B-man is known for--namely, multiplayer fun. As a Bomberman game (that is, as a multiplayer game), Bomberman 64 isn't all that great. Playing against Al opponents is barely fun at all, and the 3-D arenas make playing against your friends more of a hassle than it's worth. I understand that the entire game is 3-D and they couldn't make the Battle Mode 2-D, but as it stands, the Multiplayer Mode needs a lot of work. Overall, it's a solid game, but those camera angles need some work.
Bomberman 64 represents a pretty drastic change to my favorite multiplayer series. Even though it plays almost nothing like previous Bomberman games, the One-player Mode is still a lot of fun and offers a nice change of pace from the tried-and-true 2-D mayhem of the old days. Finding all the hidden Gold Cards is a nice added challenge, and the reward is well worth it. My main gripe is that the Battle Mode gets old too fast.
Bomberman 64 looks exactly like how I'd picture Bomberman in 3-D. But in my book, certain games should stay 2-D, and the B-man series is no exception. The one-player game is fairly decent. A third dimension gives the developers much more room to be creative here. Unfortunately, it doesn't work for the multiplayer game. The 2-D games are much more exciting and frantic. The game could also use some more multiplayer maps.
This marks the most drastic change in the Bomberman series, and I'm not just talking about the 3-D graphics. The One-player Mode is much better than previous B-man games, thanks in part to more in-depth gameplay and new elements. I don't like the faster-paced Multiplayer Mode quite as much as the previous ones, but it is different, intense and fun to play. It's good to see this new take on the Bomberman series done right.
Bomberman 64 Green Garden
Stage 1: Untouchable Treasure
This stage is fairly easy, and something of a learning experience. At various points along the way you will meet Sirius who will give you helpful (and not so helpful) information and advice. To talk to him, press B.
Your objective for this stage is to deactivate the four force shields surrounding the gem in Area Two by standing on four square glowing switches.
You start in Area One. The best thing to do first is to blow jp the six pots directly in front of you, and collect the power-ups - it's always advisable to collect as many power-ups as possible on each stage.
The first switch is in a cage on the right as you enter Area One. To reach it, move around to the front of the cage, where there is a gap in the mesh at ground level. Kick two bombs through this gap so that they land against the pillars supporting the cage roof. When the pillars blow, the roof will collapse, and you can run around to the bottom left-hand side, climb up the steps and drop into the cage to activate the switch.
Now take the steps up out of the cage, drop to the floor, and make your way upscreen to the top of the stage, where a green lizard head guards the entrance to the next area. Go right when you reach the head, and the next switch is hidden just under the raised platform in the comer.
To get through the green head to Area Two, detonate a bomb next to it and it will open its mouth.
Once in Area Two, and bearing in mind that direction is based on the default camera angle, go left, then down, until you see the third glowing switch. Climb the small flight of steps to the left and go upscreen to activate the switch. Downscreen from you is a bridge, underneath which is a pot containing a remote bomb power-up. Climb the steps to the bridge and follow it along until you come to the end, then drop off upscreen to land on the fourth switch. Now simply make your way upscreen around the podium and up to the green arrow to exit the stage.
Stage 1 Gold Cards:
- Gold card 1: In a blue column to the left of the waterfall. Area One. Get to it by destroying the blue pillars on the left blocking the stairs to the bridge.
- Gold card 2: In a floating block to the right of the lizard head in Area Two. Cross to it by blowing up the blue pillars blocking the path across the river, then take out the block with a pumped red bomb. Stand on the grey switch to slow the water down.
- Gold card 3: In Area Two, drop right off the bridge at the bottom to the teleport there - you'll need to nuke the blue pillars to do this -then walk upscreen to the end of the room and blow the block you'll find there for the card. To get out, climb the steps and follow the walkway. If you slowed the water when you picked up card 2, you'll be able to wade along the river back to Area One and get out there.
- Gold card 4: Kill thirty enemies.
- Gold card 5: Complete stage within target time.
Stage 2: Friend or Foe?
This stage is fairly simple. Your helpful friend Sirius decides to test your combat skills by trying to kill you! With friends like these...
He's fairly simple to defeat, since all he does is kick or throw bombs, and if you stay out of his way, he's liable to blow himself up anyway: Failing that, just kick a few bombs at him to stun him, and they should take him out Your only problem will be if you get in the way of one of his bomb kicking sessions, as he will happily kick you and you may be too stunned to move away from the bombs. If he drops a pink heart, grab it and you'll be able to take a hit without dying.
Stage 2 Gold Cards:
- Gold card 1: Hit Sirius with a bomb blast.
- Gold card 2: Hit Sirius with a pumped bomb blast (basically you get them both with the one pumped bomb).
- Gold card 3: Bounce a bomb on Sirius' head.
- Gold card 4: Beat Sirius.
- Golo card 5: Beat Sirius within the target time.
Stage 3: To Have Or Have Not
YOU START THIS STAGE IN AREA ONE with the gem directly in front of you. Run upscreen towards it and an annoying bird steals it! Keep moving upscreen, and detonate a bomb by the lizard head to open it. Move through to Area Two, and you'll come out facing left. Continue left, and you'll see two sets of steps leading up to a platform with three square panels set in the floor. Kick a bomb under the bottom-most of the three panels and then quickly run up the stairs and stand on the panel. It will boost into the air, allowing you to climb off onto the roof at the top.
Make your way right along the roof and up the small flight of stairs to the gem, which will once again be stolen by the bird. Watch where the bird takes the gem, as it gives a clue to where you'll be going next. Go back down the steps and right until you drop off the roof, then make your way back and out through the lizard head to Area One.
Come downscreen to the junction of the path, then go right and you should see another set of stairs and another square bomb-powered elevator block. You may need to move the camera view around to get a decent view -remember that these directions are based on the default view.
Once again, kick a bomb under the square panel and rush up the steps to ride it up to the roof of the building. At the top move right and upscreen and then climb the stairs to get to the gem, which will be stolen one last time by the bird. After watching the bird drop the gem at the top of the tower and then get whacked by Sirius (he could have come along a little earlier), you'll notice that your camera angle has changed. So, based on the new angle, come down the steps and then downscreen until you drop off the roof where you initially came up.
Go right and upscreen, followed by left and upscreen again to climb steps onto a small ledge. Once on the ledge, pump up a bomb, and drop it in front of the grey stone door, then drop off the ledge and move away. The bomb will destroy the door and the platform above revealing a teleport. Make your way upscreen onto the teleport and beam to Area Three.
In Area Three, go upscreen from the arrival teleport and climb the steps immediately to your right. Go across the grass and drop down into the small open area, then go up the steps to the second area of grass. You'll see another boost platform, so kick a bomb underneath it and jump on, getting off to the left at the top. This will put you directly in front of the next boost panel, so kick another bomb under it and get on top! At the top this time climb off upscreen, because the platform to the left is very narrow and chances are you'll drop off the edge. Make your way upscreen to the edge of the platform and go left to climb the stairs, then come downscreen to grab the gem for the final time and exit the level.
Stage 3 Gold Cards:
- Gold card 1: In a floating block in Area Two. You'll need a remote bomb; there's one at the top of the tower in Area Two. Take the winding route which runs downscreen from where you came in, and you'll find the card in one of the blocks on that route.
- Gold card 2: In a block on a small platform on the left side of the tower in Area Three. Go to the upscreen end of the platform on the opposite side of the tower to the stairs which lead to the gem and drop left to get to it.
- Gold card 3: In a block in the upper-right hand corner of Area Three. You need to bomb-bounce to get to it
- Gold card 4: Kill thirty enemies.
- Gold card 5: Finish within the target time.
Stage 4: Winged Guardian
On this stage you need to defeat the blue dragon defending a narrow bridge. It's not possible to fall off the sides of the bridge, but you can drop off either end, so be careful. The dragon has a few different attacks, from breathing fire to attempting to grab you in his jaws. To defeat him, pump up your bombs and detonate them close to his body. You can damage parts of him, like his wings for instance, but this only serves to make him angry, so it's advisable to go straight for the body. If he draws back and swoops towards you, he's not actually attacking, he'll just fly under the bridge, which gives you time to pump up a bomb and get ready to throw it once he's turned around. Be especially careful when you're pumping up a bomb if the dragon is breathing fire, because if the flames catch the bomb, they'll both detonate it and you.
Stage 4 Gold Cards:
- Gold card 1: Hit the Dragon's head with a bomb blast.
- Gold card 2: Hit one wing with a bomb blast.
- Gold card 3: Hit the other wing with a bomb blast.
- Gold card 4: Hit the Dragon's tail with a bomb blast.
- Gold card 5: Finish the stage within the target time - you must get all four of the other cards before you finish the stage though, unlike the exploration stages where you can go back once the stage is finished.
Bomberman 64 Blue Resort
Stage 1: Switches and Bridges
Rather surprisingly, this stage deals primarily with switches and bridges! From the start position in Area One, go left, up the steps and along to the left until you reach a pair of huge metal doors blocked by crates. The crates contain power-ups, but the doors cannot be destroyed as yet, even with a pumped bomb, so you'll need something a little stronger.
Go right and then forward up the steps to the trees, which will give you gems if you blow them up. Move right and up the steps by the water, then upscreen up the second set of steps to the raised bridge. To lower the bridge, pump up a bomb and place it at the top of the stairs.
Once the bridge has lowered, go upscreen across the bridge and on up the stairs to Area Two. In this area, there are loads of trees which will supply you with gems, but there are also large rotating guns that track you and drop fireballs on top of you if you stand stilL
Go right slightly, and then walk upscreen parallel with the red-brick building until you come to a set of steps with a square flowerpot next to them. If you blow up the flowerpot, youll get a remote bomb. Carry on up the steps, and then upscreen up the next set of stairs and into Area Three.
In here, go left to the left-facing stairs leading up to a blue column. This is a switch, so climb the stairs and stand on it to activate. Youll notice that the dam cuts off the water flow to the area immediately below you.
Now go right, and down the first stairs on your right into Area Four. Keep going down the stairs until you reach the pebbled area that was previously underwater. There are more guns in this room, so keep moving at all times. Make your way downscreen, down two flights of stairs, and blow up the first grey box on the right (with the noughts and crosses board on the top) to receive the super-bomb weapon. Now walk downscreen and drop off the wall to land back in Area One, on the opposite side of the water to where you started. Go left up the stairs, and drop a bomb by the bridge to lower it - you don't need to use a pumped bomb this time, a small super-bomb will be sufficient - and come downscreen across it Keep going in the same direction until you come down the steps next to the huge metal doors.
Now pump up a super-bomb and drop it by the doors. Wait until you get clear before you blow it though - if you don't have the remote item, run! Once the bomb has blown, go back and up through the open doors. Make your way up the stairs in the upper-right corner of the building, and then go right and down onto the blue switch, which will lower the huge bridge just outside the building. Come downscreen and go left towards the green arrow to exit the stage.
Stage 1 Gold Cards:
- Gold card 1: Get a remote bomb in Area Two and blow up the rotating cannons with pumped bombs. One of them will give you the card.
- Gold card 2: Enter Area Four using the bridge in Area Two, and then use a pumped remote bomb to bring down the bridge across the water. Go downscreen and blow up the square flowerpot for the card.
- Gold card 3: By a tower in Area Three. Don't activate the switch, as this blocks your route. Instead, follow the platforms round and to the left. Gold card 4: Kill thirty enemies. Gold card 5: Finish within the target time.
Stage 2: Vs Artemis
In addition to dropping and kicking bombs, Artemis has a gun which fires three bullets. You'll have some warning before she fires, because she'll leap into the air, and the shots are always forty-five degrees apart.
You'll die if you're hit by one of the explosions from these bullets (although the bullets themselves cannot harm you), and of course they set off bombs, so don't let any get too close. Artemis recovers fairly rapidly, so just kicking a bomb at her won't be sufficient. You'll need to kick a bomb her to stun her, then kk a second bomb to tun her again to give ie first bomb time xplode. Grab the pink «art that she drops then you bomb her and outl be able to take a lit without dying.
Stage 2 Gold Cards:
- Gold card 1: Bounce a pumped bomb on Artemis' head.
- Gold card 2: Hit Artemis with the blast from a pumped bomb.
- Gold card 3: Hit Artemis with the blast from a pumped bomb while she's doing her special attack.
- Gold card 4: Beat Artemis.
- Gold card 5: Beat Artemis within the target time.
Stage 3: Pump It Up!
In Area One, from the start position, go left and drop a bomb to blow up the crate that's blocking the archway. Once you've taken care of the crate, go up through the archway and then right and up the stairs onto the walkway. Pump up a bomb and drop it by the rotating gun, then get clear. Once the bomb has destroyed the gun, go downscreen along the walkway, left up the steps and across the bridge into the area with a tree. Keep moving left through this area and exit across the walkway into Area Two.
In the new room, move upscreen and drop a pumped bomb by the bridge to lower it. As soon as the bridge is down, go upscreen across it, and then go up the flight of stairs which runs left up to Area Three.
In here, go left slightly and downscreen to use a pumped bomb on the bridge that you find there. Cross the bridge, then climb the stairs to activate the blue switch. Go back right, across the bridge and down the stairs that you came up back into Area Two. Keep on right down the stairs and at the bottom of the stairs go left and drop into the area that was previously filled with water.
The block structure second from the bridge contains a vital superbomb item. With your new superbombs, make your way left until you reach the wall with the red symbol on it Pump up and detonate three bombs against this wall to make it move back in line with the other walls allowing water to flow along it, raising the exit staircase.
Now come down the screen and right a little to find the stairs leading out of the pit, and climb left up these to find the narrow stairs which take you too the exit. Climb them!
Stage 3 Gold Cards:
- Gold card 1: In Area One, at the left end of the walkway that you start on.
- Gold card 2: In a plant pot in Area Two. across the bridge to the left of where you came in.
- Gold card 3: In Area Three, follow the platform round from the switch and blow up the flowerpot up.
- Gold card 4: Kill thirty enemies.
- Gold card 5: Finish within the target time.
Stage 4: Sewer Savage
You now need to battle a mutant fish, who attacks you in three different ways. He pops out of the water and attempts to hit you with his mace-like appendage (fnarr), he nips ahead of you and throws bubbles at you, and he swims some distance away and leaps into the air, sending back a knife-like wave that chops bits from your raft. In between, he'll swim quite harmlessly behind you. The best time to hit him is when he attacks with his 4mace\ or when he's swimming behind you. Using a pumped bomb is the most effective way - you need to hit him on his body, although if you aim carefully, it is also possible to disable his mace. The bubbles can be easily avoided, and if they hit you, they only make you dizzy, so they're not too much of a problem. The knife-wave is more dangerous, as it drastically reduces your space if you're not careful. The best thing to do is to run to one side of the raft when the fish swims out, and then when he jumps out of the water run back to the middle of the raft. This way you should hopefully only lose one log. Following the wave, you'll get a wash from the fish's re-entry into the water which temporarily swamps the raft and will push you off if you're not careful. To avoid getting knocked into the water, position yourself fairly centrally on the raft, and as the water hits you, move forward (upscreen) to compensate.
Be careful not to run off the edge when the water recedes!
Stage 4 Gold Cards:
- Gold card 1: Blow a pumped bomb up in the fish's face when he tries to hammer you.
- Gold card 2: Blow a pumped bomb up against the fish's 'mace' appendage.
- Gold card 3: Blow a pumped bomb up on the fish's tail when he's in bubble attack mode.
- Gold card 4: Difficult one this - get the raft down to only one log. Needless to say, you should take the fish's energy down to minimum before you do this, as dodging will be a problem.
- Gold card 5: Beat the boss within the target time.
Bomberman 64 Red Mountain
Stage 1: Hot On The Trail
Beware of the burning balls of molten lava that fall from the sky! When they launch, they make a distinctive 'whoosh' noise so keep an ear out for it. Before they land, a shadow will appear, which should give you time to get out of the way, but they also set off any bombs they hit, so be careful not to get caught in the explosion. There are also things that look like cone-shaped rocks on this level which open to breath fire at you, and stun you if you touch them, so don't wait around near them.
There is more than one way to get to the exit on this level, but this is Gn my opinion) the easiest.
From the start point in Area One, go up and then right onto the metal walkway. Follow the walkway along and down to the next rocky platform. Make your way up to the top end of this platform, and then go all the way left to another walkway also leading left. The large rock slab on the upper edge of the platform is a bridge which can be toppled by a pumped bomb, and this leads to Area Five and through there (across another bridge) to the upper part of Area Four. You'll be going the slightly longer way in order to collect the remote power-up.
Follow the walkway left and down onto the metal platform, keep left straight across this and up the raised metal platform into Area Two.
In Area Two, continue onto the grey walkway, and go along it to the thin rock platform.
Follow the rock platform up the screen, and take the first walkway on the left, timing it so as to miss the fireballs which pass through it from the lava below. The walkway takes you to a rock platform in the shape of a reversed eL\ Blow up the rock at the bottom and collect the remote bomb item that it releases. You'll see why you need this later.
Now go up and right, back across the metal walkway until you reach the thin rock platform, and go up to the next walkway on the left which you should cross. This walkway also has a pattern of fireballs passing through it, so be careful. Make your way downscreen to the bottom edge of the next rock platform, and go down the screen along the metal walkway that you'll find there to a junction platform with walkways leading left and right.
Here, take the left walkway to the next rock platform, moving you into Area Three, and placing you on a larger rock platform. Go left about halfway along this new platform, and then go upscreen to drop down onto the lower platform, then make your way to the upper-left hand corner and up the brown metal walkway to the next platform.
Climb the wide metal walkway upscreen until you're level with the red mesh. It's wise to pause here, since fireballs pass through just as they did the walkways previously. Time it, then move up onto the next metal walkway, and - again watching for fireballs - pass upscreen over the red mesh and onto the rock platform at the top. Watch out for fireballs from the sky when on the wide metal walkway.
Move right along the top edge of the platform until you reach the walkway leading down to the right - a super-bomb weapon can be picked up from one of the rocks here, but you don't need it to get off the level - and take the walkway to the small rock platform passing you to Area Four, which puts you on the, rock platform with the blue mesh ramp.
Move right, and go up the ramp, stopping short of the red mesh. On the wall in front of you, you will see three switches. All three need to be activated by hitting them with a bomb to bring down the bridge leading to the exit. Unfortunately, the switches only stay down a short while before resetting, and the red mesh is perforated by fireballs at regular intervals.
This is where the remote bombs come in handy. If you had normal bombs at this point, you'd need to rush to hit all the switches, and would likely get hit by a fireball. However, because remote bombs don't explode until you want them to, it's possible to throw the bombs onto the switches so that they stay bouncing on top of them giving you as much time as you need to activate them all. The best switch to start with is the one on the top left. Go all the way to the left of the platform, and make sure you're in the last mesh row along on the left. Once you've reached this bit, you'll be able to move left and right along the section without getting hit. Throw your bomb at the switch to the left of the exit, then move right and do the same to the second switch. Then turn to face the third switch and bomb that one to lower the exit bridge, allowing you to pass over to the exit.
If you find that you can't get your bombs to reach the first switch, then you'll need to exit the game and go to the options screen, and change the bomb distance control so that it's operated by the B button, instead of the analogue stick.
Stage 1 Gold Cards:
- Gold card 1: Take the right walkway at the junction platform in Area Two (the left walkway leads to Area Three) and blow up the rocks on the subsequent platform.
- Gold card 2: Behind a metal door built into the bottom of the first platform along from the start platform. Get the super bomb and drop off the downscreen side of the platform to reach it.
- Gold card 3: On the highest platform in the upper part of Area Four, reached through Area Five.
- Gold card 4: Kill thirty enemies.
- Gold card 5: Finish within the target time.
Stage 2: Vs Orion
Sub-boss Orion has an expanding shield which protects him from explosions and knocks you dizzy if it touches you. While you're dizzy, Orion will try to pick you up and throw you off the platform, so it's imperative that you spin the analogue stick fast to recover. Like Artemis on level two, Orion recovers quickly, although the blocks on the level make it possible to trap him by firing off a load of bombs at him at once. You can tell when he's about to activate his shield because he crouches and grunts loudly.
Stage 2 Gold Cards:
- Gold card 1: Bounce a pumped bomb on Orion's head.
- Gold card 2: Hit Orion with the blast from a pumped bomb.
- Gold card 3: Run directly into Orion's shield.
- Gold card 4: Beat Orion.
- Gold card 5: Beat Orion within the target time.
Stage 3: On The Right Track
There is quite a long, convoluted way of negotiating this stage, but thanks to the miracle of modern sneakiness, it's possible to take a short cut.
From the start point in Area One, move down so you're level with the track, wait for a cart to pass then blow up the signal on the downscreen side of the track and go downscreen down the ramp to the walkway below. You should see a railway track leading to a rock platform way down below you. Ordinarily you'd need to go through Areas Two and Three to reach the platform, but it's possible to reach it simply by jumping off the platform to the right and landing on the track. Jump off, and you might find it helpful to change camera angles for a moment while you clear away the mine carts and any enemies. Once you've cleared the platform, reorient the camera angle back the way it was when you jumped down.
Move left along the track until you enter Area Five, where the default camera angle changes. Based on the new camera angle, go downscreen across the red mesh and along the rock platform until you come to the bottom edge, then move right until you come to a very long walkway going upwards. Follow the thin rock platform until you reach an obstruction, which you should destroy. Now wait by the track until an enemy cart goes past, and follow the track down, right, past the first rock platform and along to the next one. Get off the track on the upscreen side of the platform, then walk upscreen down the walkway which leads from the right side of the top edge parallel with the track. This will take you down to a thin ' rock platform, which you should follow upscreen to a larger square platform.
Go right across this platform and take the second thin rock platform right, downscreen and left onto the smaller square platform, then down and right along the third thin rock platform to a metal walkway leading up to the right. Go up the walkway to the large platform, drop a bomb on the small outcropping, and retreat back down the walkway a little way until the bomb destroys the barrel obstructing your progress. Move up and right and you will see four pillars holding up a section of track. Blow up the four pillars, then pass across the track without getting run over onto the metal platform with the green arrow to exit the level.
Stage 3 Gold Cords:
- Gold card 1: In Area Four, there are four switches situated near the tumbling boulders. Hit alt four of them to activate the arrow by the spikes, and hit that to lower the spike and give you the card.
- Gold card 2: Cross the mesh platforms in Area Three using the barrels. The card is inside a furnace.
- Gold card 3: In Area Two inside a barrel, which is stacked on the edge of another barrel blocking one of the tracks. You'll need the remote bombs (which can be found if you follow the tracks in Area One) and the card is tricky to catch.
- Gold card 4: Kill thirty enemies.
- Gold card 5: Finish within the target time.
Stage 4: Hot Avenger
The volcanic robot will attack you in a number of different ways. He will try to punch you to stun you, and then attack you with his eye beams. Try to dodge the punch, but if you fail, rotate the stick fast for a quick recovery before dodging the beams. The easiest way to accomplish this is to run to one side of the platform, then just as the robot fires (you'll know when this is, because his eyes start to flash) run across to the other side, and if necessary, around the edge, until the beams vanish. He will also .attack you by spinning with his arms outstretched, at which point only his fists will hurt you, so you need to keep inside his reach such that the fists pass behind you.
The third attack comes when he ducks under the lava, then pops up so that only his head is showing and fires lasers with one or both eyes, which can be avoided by keeping on the move. The final attack seems only to happen if you succeed in disabling the robot's arms. He fires lava bombs from his hat, and the best technique seems to be to get to the far left or right edge and hope for the best, since the bombs don't always give a shadow but they do seem to hit mostly in the centre of your platform.
In between all these attacks, the robot walks round you in a circle. It is at this point that he is vulnerable -pumped bombs are recommended -and also when he's facing you head on. The most effective technique is to throw a bomb at the robot's arm just as he begins to turn, so that he pivots into the explosion. This is a very good way to disable his arms, but isn't necessarily recommended since it triggers the lava bomb attacks which are the most difficult to avoid.
Stage 4 Gold Cards:
- Gold card 1: Blow a pumped bomb up on one of the robot's arms.
- Gold card 2: Blow a pumped bomb up on his other arm.
- Gold card 3: Blow a pumped bomb up on his hat.
- Gold bomb on the robot's head after destroying his hat, and you'll see Orion in the control hatch. Throw a bomb into the hatch.
- Gold card 5: Finish within the target time.
Bomberman 64 White Glacier
Stage 1: Blizzard Peaks
From your start position in Area One. go upscreen and drop off the start platform, and then head up left and cross the little bridge. You need to move left up the steep slope next, but if you do you'll find your way blocked by a bank of snow. To remove the snow, you need to start an avalanche, and this is achieved by dropping a bomb at the base of the snow blocking your path. Because Bomberman moves very slowly in the deep snow of the slope, the safest way to trigger the avalanche wfthout getting swamped by it is to go left up the slope until you reach the piled snow, then come downscreen until your progress is blocked by a small wall. Drop the bomb here, then go immediately right until you're clear of the wall, and drop downscreen off the slope onto the platform with the tree. Stay here until the avalanche has passed. Now blow up the tree, then go upscreen and right up the slope to the top. Drop downscreen onto the platform which holds a snowman and a tree. Blow up the tree, then go to the bottom-left edge of the platform and drop to the small platform below, before going left through the door to take you to Area Two.
In Area Two you need to go up the mountain, and as if snowball-throwing snowmen, bouncing snow-bunnies and mad snowboarders weren't enough to contend with, you have to deal with huge gusts of wind that threaten to blow you away. When the wind blows, just face into it and keep walking - you should be okay.
From where you came into Area Two, go right a short way, then come downscreen until you reach a fence, and go left up the slope. At the top of the slope, come downscreen again to the bottom of the next slope, and go left up that one to the slope with the hut which disgorges loads of snowboarders. If the snowboarders are a problem, a pumped-up bomb will take care of the hut and stop them. Go upscreen, passing to the right of the hut, to the top left of the platform, and take the bridge up and right to Area Three.
In Area Three, you need to make your way diagonally up and right up the slope to the summit, where you will come to a small fence and a ski lift just upscreen of you. The ski lift is inoperative at the moment, so come downscreen down the slope which runs parallel with the fence, and you'll come to a hut. Blow up the hut with a pumped bomb, then climb over the fallen roof and stand on the switch. Now return to the now active ski lift, climb on and you're out of there!
Stage 1 Gold Cards:
- Gold card 1: In Area One, inside the tree that you need to destroy to reach Area Two.
- Gold card 2: In the tree behind the snowboarders' hut, at the top of the mountain in Area Two.
- Gold card 3: Go right from the ski lift in Area Three, down the mountain and across the bridge to Area Four. Make your way down the mountain and you'll come to another hut spewing snowboarders. Go past this hut, and you'll find a tree standing on its own. This tree holds the card.
- Gold card 4: Kill thirty enemies.
- Gold card 5: Finish within the target time.
Stage 2: Vs Regulus
As with the other sub-bosses, Regulus has a special attack. He jets towards you and attempts to ram you. If this doesn't sound quite as dangerous as previous special attacks, it's because it isn't. Regulus is one of the easiest bosses to beat. You'll know when he's about to commence his attack run as he gets a glowing halo around him before he comes at you. Because he attacks in a straight line, it's easy to move out of the way, but it's actually better to stand your ground, and instead kick a bomb at him which will stop him in his tracks.
Stage 2 Gold Cords:
- Gold card 1: Bounce a pumped bomb on Regulus' head.
- Gold card 2: Hit Regulus with the blast from a pumped bomb.
- Gold card 3: Kick a bomb into Regulus when he charges.
- Gold card 4: Beat Regulus.
- Gold card 5: Beat Regulus within the target time.
Stage 3: Shiny Slippy Icy Floor
Okay, this level is a bugger, but fortunately not literally. Presumably the programmers decided that the game wasn't quite difficult enough, and so this level has a slight 'quirk', which we'll come to in due course.
You start on a thin platform in Area One. The icy-looking surface upscreen from you is - yes! - ice, but thankfully you don't have any gusts of wind to worry about this time. Move upscreen onto the ice, and go right parallel with the edge of the platform until you reach the first comer, then move upscreen across the platform and through the door into Area Two.
This is where the 'quirk' comes in. If you move forward, upscreen, you'll notice that the camera swings about so that you're viewing the game from underneath the platform. Fortunately this isn't really a problem, for the moment at least, since all you want to do is walk from one door straight across to the next. Start moving forward upscreen, which will quickly become downscreen as the view shifts, but just keep going in a straight line and you'll come to another door which you should enter to take you to Area Three.
This is the trickiest bit of this level. You enter Area Three on a small, thin platform. You need to make your way along the really narrow bit until you're about level with the upper edge of the slope which drops away to the left (so at the point just before your platform widens again).
The next few steps happen without pause; you won't have time to stop and check the instructions, so read them all now! Move left onto the icy slope, and you'll begin to slide down it. You want to pick up as much speed as possible, so keep moving left as you slide. You'll need to keep moving upscreen slightly to correct for the shape of the slope, and when you come to the first hole, make sure you go around it on the upper side. At the bottom of the slope, keep heading left, and if you went around the correct side of the first hole your momentum should carry you up the next slope avoiding a second hole, and past a white snow-covered platform with the switch. When you pass this, move upscreen so that when you drop back to the right you land on the platform. Blow up the snowman, then move right along the platform to activate the switch. Phew!
Now drop downscreen off the platform onto the ice, and you'II slide down to the middle. Walk downscreen along the middle section, and then down and left to go through the door and into an elevator to Area Four.
Area Four is another one where the camera flips, but as before ftls just a simple matter of keeping moving in one direction. Head downscreen until you reach the door back to Area One.
Once safely in Area One, follow the upper edge of the platform right until you come to the short path which leads to the ski lift, move upscreen and hop on the lift!
Stage 3 Gold Cards:
- Gold card 1: In an icicle at the end of a narrow ice walkway leading from the platform in Area Four.
- Gold card 2: In an Icicle at the end of a narrow ice walkway leading from the platform in Area Two.
- Gold card 3: In an icicle standing on a small platform in Area Three. To get to it, don't slide down the slope; instead follow the platform you enter the room on around to the left, then drop left off the end to land on the small platform.
- Gold card 4: Kill thirty enemies.
- Gold card 5: Finish within the target time.
Stage 4: Cold Killers
The ice spider looks pretty vicious, but isn't that hard to defeat. As soon as you start, rush forward and keep yourself positioned under his shadow so that he can't hit you with his pincers. Occasionally he'll jump into the air and try to smash you. To avoid getting mashed, watch the shadows (one for his body, two for his claws) and keep under the body shadow while he's in the air. The best way to get the spider is to pump up a bomb, and then wait either until he gets confused - he'll pause and a question mark will appear above his head - or else until the moment immediately after he lands from trying to smash you. Throw the bomb at his body, detonating it as close to him as possible, while running back to keep clear of the explosion.
Sometimes the spider will change posture and climb onto the wall, moving round it to release small enemies. The enemies are easily killed, and a well-placed pumped bomb will knock the spider off the wall.
When you knock the spider down to his last heart, he'll smash through the floor, dropping him and you onto his web below. His web has holes in it which you can fall through. However, if you do sometimes Sirius will catch you and carry you up to drop you back on the web. One more pumped bomb to the body will then eliminate the spider for good.
Stage 4 Gold Cards:
- Gold card 1: Hit one of the ice spider's claws with a blast from a pumped bomb.
- Gold card 2: Hit the other claw with a blast from a pumped bomb.
- Gold card 3: Hit the ice spider's helmet with a pumped bomb.
- Gold card 4: Hit the ice spider's underside with a pumped bomb.
- Gold card S: Finish within the target time.
Bomberman 64 Black Fortress
Stage 1: Go For Broke
This stage is actually in two parts -: ; the first is a fairly simple matter of making your way from right to left to reach Area Six, and then you need to beat some automated weaponry.
You start in Area One. So far, we've been using the default camera angle to work from, but for this stage, it's extremely unsuitable, so tap C Right twice, and the resulting angle (you should be looking up the road) is the one the directions will be based on.
You can move up the road using either the left or the right carriageway, but for the purposes of this guide, we're primarily using the right. You'll notice that each carriageway is divided into three lanes, and there are two kinds of traffic - the long buses that take up two lanes, and the small cars that only take up one. The traffic moves in a set pattern. The pattern is as follows; bus in right two lanes, car in right lane, bus in left two lanes, car in left lane. However, when you first enter an area, the sequence starts with the car in the right lane. Once you recognise the pattern, moving across the carriageway shouldn't be a problem.
The carriageway is full of lowered sections which prevent you from just running straight up the road through each level. Although not the simplest, what follows is the safest way to reach Area Six.
From the start point, go right and slightly upscreen, then head across the carriageway and up the slope onto the platform with the yellow circles. From this platform take the brown walkway onto the blue translucent platform. Move left along this one, and continue into the middle of the centre platform. From here, move upscreen and drop onto the pink carriageway partition below. Next, kick a bomb into the gap between the partition you're on and the next one, and move upscreen, bouncing on the bomb to get across. Your way is obstructed, so drop a bomb next to the obstruction and quickly turn around, move downscreen to the edge of the partition. Kick another bomb into the gap and bounce across to get clear of the resulting explosion. Once the obstruction has cleared, kick another bomb upscreen into the gap, and bounce back across the partitions.
You now want to get from the partition onto the grey part of the carriageway (it's not possible reach the next partition and you don't need to). To get across, throw a bomb so that it lands on the chequered, lower part of the road. Then run upscreen off the partition, bounce on the bomb, and nip out onto a clear piece of carriageway (either left or right) until your bomb has exploded, then duck back into the gap.
Now wait until a lane is clear, and run right and upscreen into the tunnel to Area Two.
In Area Two, run right into the first gap in the wall and wait for the car to pass on the right, then go left and upscreen, down the steps to the lowered area, and wait in the right lane for the bus to pass on the left. Move into the middle lane and wait for the car to pass in the left lane then run left, upscreen up the steps, and right into the next alcove. Make your way upscreen in the alcove, wait foj the car to pass on the right again, move left into the lowered bit, wait for the bus and car to pass on the left and go left and up the steps and into the tunnel to Area Three.
This area is the first to have remote guns. They track you when you're on the translucent walkways and you can't destroy them, so just keep moving so that they don't get a lock.
When you enter Area Three, run right up the slope onto the platform with the yellow circles and then go left up the brown ramp onto the purple walkway. Next, head upscreen to the top edge, right down the next brown ramp and onto the slope down to the carriageway. Time your run, and go left to the gap in the central partition, then watch the pattern of the vehicles on the left carriageway (the pattern is similar to the one on the right, except that the car comes before the bus on each side) and run across left, up the other slope and then right up the brown ramp onto the purple platform. Follow the platform all the way right, then upscreen to the brown ramp and right down it to the slope. When the traffic allows, go left onto the carriageway and upscreen into the tunnel and Area Four.
In Area Four, go immediately right into the alcove by the wall, and repeat the same steps you did in Area Two to take you to the tunnel for Area Five.
Here, run immediately left and upscreen until you reach the gap between the partitions. Dodge the traffic and run left, up the slope to the dotted walkway, and go right up the brown ramp onto the red translucent walkway, and across until you're over the central partition. Face upscreen, and position yourself so that when you throw a bomb, it lands at the base of the partition. The next three actions need to be done rapidly; pump up a bomb, throw it upscreen so that it lands by the base of the partition, then quickly as possible, grab another bomb and throw it on top of the pumped one before dropping down onto the two bombs. If you're fast enough, you'll bounce off the bombs onto the partition before they explode. You'll get dazed when you do, so be careful when rotating the stick to stand up or you'll fall off the partition.
Kick a bomb upscreen into the partition gap, and bounce across upscreen to the other side. Then throw a bomb upscreen so that it lands in the lowered section of road, and bounce off it onto the next bit of the carriageway. Timing your run, go left across the carriageway and up the slope, then go right up the brown walkway onto the translucent platform. Now go downscreen until you reach the bottom edge, right until you reach the right edge, and up until you get to the walkway with little red arrows which takes you to Area Six.
The camera angle changes for Area Six, so based on that, come downscreen up the first ramp, then left up the next ramp and upscreen along the walkway to the brown platform, and right to the two boxes. Blow them both up for super bombs and remote bombs, then continue right, downscreen on the purple walkway, and left down the ramp back to the junction. Come downscreen into the arena. Blow up the two boxes to give you room to move, then move downscreen across the red symbol.
Once the guns have come out, move back across the symbol onto the brown floor, putting you out of range of the autogun. Start kicking bombs upscreen along the centre of the arena, keeping an eye out for the blue fireballs that the side guns will launch. You'll have a warning because the gun ports glow blue and a whirring noise rises in pitch before they fire. You'll need to dodge them. Keep kicking bombs and the guns should be destroyed fairly quickly, allowing you to exit the stage.
Stage 1 Gold Cards:
- Gold card 1: In the right section of Area Two, in the traffic pole in the last alcove on the right.
- Gold card 2: In the right section of Area Four, in the traffic pole in the last alcove on the right.
- Gold card 3: In the left section of Area Four, in the traffic pole in the last alcove on the left.
- Gold card 4: Kill thirty enemies.
- Gold card 5: Finish within the target time.
Stage 2: High-Tech Harvester
This hovertank boss has a number of weapons. The worst are the seeker missiles, which will lock on to you if you're close enough. You'll need to detonate bombs behind you to destroy them. If you see them about to launch - the red covers will open prior to firing - then move away, and the seeker missiles will smack into the ground. Other weapons include two satellites, which follow you then laser a circle on the ground, which will erupt in a huge and lethal explosion. A red beam from the centre of the vehicle doesn't harm you, but locks the machine-guns onto you, so you'll need to keep moving to avoid getting shot. Another attack is when the vehicle flips into the air, and then charges straight at you, so you'll have to dodge out of the way. It also launches a strange glowing sphere, which doesn't harm you, but seems to make you and your bombs move slower. The easiest way to take out this boss is to use normal bombs, rather than pumped bombs, and keep kicking them at it and detonating them when they're near to it.
Stage 2 Gold Cards:
- Gold card 1: Hit the right gun port on the hovertank with the blast from a pumped bomb.
- Gold card 2: Hit the left gun port on the hovertank with the blast from a pumped bomb.
- Gold card 3: Hit the glowing sphere with the blast from a pumped bomb.
- Gold card 4: Hit the nose of the hovertank with a bomb
- Gold card 5: Finish within the target time.
Stage 3: Trap Tower
On this stage, you need to make your way up and out of the tower.
You start on a metal platform at the left of Area One. Go right between the square poles, and then upscreen to stand on the switch (a square panel) which activates a bridge to your right. Come downscreen and right across the purple bridge, then upscreen, right up some steps, and continue right to activate switch two, which sets off lasers to the left. Go left, taking care to avoid the lasers, down the steps, then downscreen and up the second set of steps to the right. You'll see a walkway with three squares that change from red to green. Make your way across right, staying on the green square, and get on the elevator to go up to Area Two.
From the elevator in Area Two, go right until you come to the first switch jutting out over the abyss, and stand on it to activate it. As well as putting a bridge up, this shuts a door in the sunken area that you passed through, so you'll need to go back a different way. Go left a little bit, then upscreen across the bridge and follow the path left and across the second bridge. Head down, avoiding the lasers, and left at the junction, again avoiding the lasers, and go upscreen just past the third laser to climb onto the second elevator, taking you up to the upper level of the area.
Blow up the box which is to your left as you enter, then follow the platform left, downscreen and right to get onto the third elevator and head up to Area Three.
Go right, and then upscreen to activate switch two, then come downscreen and right all the way to switch four, which you should activate. Make your way back left, avoiding the lasers, and go upscreen in the area where you got off the lift and activate switch one. Now go downscreen and right again, then go upscreen at the junction across the new bridge, and follow the walkway right to the fourth elevator and Area Four.
To get to the fifth elevator in Area Four, go left, first down, left to the end, up, left, down and left onto the elevator to Area Five.
Nearly there! From the elevator, go right, use a pumped bomb to open the door, go right through the door and blow up the box to your right. Go right up the ramp, blow up the next box to your right then go upscreen up the ramp. Go right (watching out for the staggered platform), go downscreen down the ramp, and go right up the stairs to the exit arrow.
Stage 3 Gold Cords:
- Gold card 1: In a box on the second level of the tower (Area Two), downscreen from the junction leading to the sunken section.
- Gold card 2: In Area Three, after triggering switch four, instead of hitting switch one, hit three, then come downscreen at the junction. Go left across the red squares on the green one, and then left again over the larger group of red squares, and you'll find the box with the card.
- Gold card 3: On the upper level of Area Two, instead of taking the elevator, come downscreen from it and right to the lower arm of the platform. Destroy the box and drop to the platform below. Then bomb bounce upscreen to the second raised platform, and bomb bounce right to the third and a new elevator. Take this up, and make your way via the platforms and elevators to an elevator which takes you to a new area. Area Six. Cross the bridge, activate the switch, move back and blow up the objects in that area to find the card.
- Gold card 4: Kill thirty enemies.
- Gold card 5: Finish within the target time.
Stage 4: Vs Altair
Altair is just like the stage two bosses on the previous levels, except that he's got a hovering laser that operates independently of him, and he's a bit thick - he keeps running into explosions for one thing, and even kicks his own laser about at times.
The laser gets a glowing halo around it before it fires, and the beam should be avoided at all costs. It also sets off any bombs it hits, so watch out. Keep hammering Altair with bombs and when you've hit him enough times, he combines with his laser, giving him the power to teleport away from danger, and also an energy bolt which stuns you if it hits you,(he always says "Power!" before he fires). To take him out, you'll need to knock him dizzy in order to explode a bomb on him. And that, as they say, is that!
Stage 4 Gold Cards:
- Gold card 1 Bounce a pumped bomb on Altair's head.
- Gold card 2: Hit Altair with the blast from a pumped bomb.
- Gold card 3: Beat Altair untransformed.
- Gold card 4: Beat Altair transformed.
- Gold card 5: Finish within the target time.
On the SNES, the multi-player game made this a classic. On the N64 the battle mode is a profound flop, but the one-player game almost compensates. Aforio-style landscapes present puzzles to be solved - not by running and jumping, but with careful placement of bombs! It's a game that grows on you, but it'll never have the appeal of its 16-bit ancestor.
At it's peak on the Super NES,Super Bomberman (with multi-tap for four players) emerged as one of the most addictive multiplayer games of its time -- and it wasn't that long ago either. But Hudson look to change the look and way in which gamers play Bomberman for the Nintendo 64, although they'll hopefully keep all the tension, chemistry and multi-player fun of the original.
Of course, that sounds easy, but it may not be. Many industry pundits gawked at the one-player version of Super Bomberman and believed that the four-player game was a mere fluke. N64 Magazine hears from Japan that Hudsonsoft have retooled their development house, with a full-tilt focus on transforming their titles into 3D games, with Bomberman at the fore.
Bomberman 64 or Baku Bomberman (a working title meaning something like Bang Bomberman') is still less than 50% complete, but it appears to be a fully polygonal, texture-mapped action game with levels that make use of 3D platforms and puzzles interconnected with bridges, alleys, and secret underground passages. It's believed enemies appear throughout with powers equal to Bomberman's, leaving the player with only his or her wits to see them through to the level's end.
Even less is known about the game's multiplayer capabilities, but we're sure the facility will be included and be sensational. And with the N64's four built-in controller ports, gamers won't have to buy a multi-tap. Then again, Hudsonsoft don't deny that they've been considering an eight or even ten-player tap. We'll report more next issue.
A Mario-style adventure which involves throwing bombs instead of jumping on platforms. A likeable, if easy, diversion.
Having watched Andy struggle and swear at the Japanese incarnation of Bomberman 64, I wasn't sure whether I was looking forward to this game or not. Everything that was in the import version is still there, from the cunning puzzles to the frustrating sudden death just as you are about to finish a level.
One thing that has translated very well is the text that makes up the storyline. I mention this because if you have ever played a game converted from Japanese, you may have noticed that the English translation doesn't always make a lot of sense. This is for two reasons; the first being that a direct translation of the Japanese text often wouldn't fit into the message boxes on screen, and the second reason being that the Japanese are basically pretty weird.
Bomberman, though, makes perfect sense! (Well, in a weird, pom-pom decorated high-explosive throwing kind of way, at least.) The storyline flows well, and the text is presented in clearly understandable sentences that all appear to have some relevance to the game and haven't just been put in to fill up the space left by, say, an over-long formal Japanese greeting. This means you know from the start what are supposed to be doing, plus the manual explains all the controls (which is always a bonus in any game and is something that gave Andy a tad of trouble with the import).
Something Looks Familiar...
Graphically and audibly, the PAL conversion of Bomberman is practically identical to its Japanese counterpart, and the notorious borders that often appear on UK N64 games don't appear to have materialised this time. The gameplay is also practically unchanged, with the added advantage that you can actually understand the hints and tips offered by characters in-game. Of course, when I say 'unchanged', I'm assuming you read the import review in issue seven. For those of you who didn't (and if not, shame on you!) Bomberman 64 is a two-part game, consisting of an adventure game and a battle mode. The adventure mode is a 3-D arcade puzzle adventure, in the style of Mario 64 and Ganbare Goemon. The objective (or 'plot', if you prefer) is to free your planet from the tyranny of evil alien invaders (are there ever any other kind?) who have... er, invaded. To do this, you need to run, puzzle and bomb your way through four sub-worlds - each spread over four stages and guarded by huge end-of-level bosses - before tackling the aliens head-on on their motherworld.
The second mode, battle mode, comes in two parts; single battle and team battle. Single battle is fairly straightforward - the four players simply run about blowing seven bells out of each other with their bombs until only one remains standing. The team battle is a bit more complex (but not a lot), with two teams made up from any combination of the four players (two on two, three on one, etc) attempting to destroy five of the opposing team's coloured crystals whilst preventing the same happening to their own crystals (make sense?) Now, I have a confession to make here. I know Andy didn't think much of the multiplayer game compared with previous Bomberman incarnations, but I have to admit that I've never played any other Bomberman games (gasp... no!). I'm not quite sure how this happened, I just seem to have completely missed all of them. That said though, I have to disagree completely with Andy and say that - for the PAL version of Bomberman 64 at least - the multiplayer mode is ace! Manic mental action abounds as all players throw bombs every which way. The team mode is by far the most enjoyable, probably because your Bombermen come back to life when killed rather than staying dead, and although it does suffer a little from slowdown when there's altogether too much happening on screen, this doesn't hamper the fun at all.
It's Explosive!
All in all, Bomberman 64 is an excellent addition to a growing number of top N64 titles. The adventure mode does take a while to get into, but once you do, you'll be bombing away like there's no tomorrow! (Which there probably wouldn't be if you went running around lobbing high-explosives.)
Yes, it is similar to Mario 64, but there's more than enough about it that's different to keep even those who've played Mario to death interested and entertained. If I had to be negative, I'd have to say that you'll need to find some friends for the multiplayer mode, since once you've gotten used to it, the AI players are just too easy, even on their highest setting. Not that that makes it any less enjoyable though, as they are good enough that although you'll win every time, you'll have fun doing it.
Oh dear. A big disappointment. The one-player mode was always a bit tedious but the multiplayer game has been completely ruined.
Boom! Shake the room! Bomberman's back, and he's set to blow up the N64 with all-new features. Bombs now blossom into mushroom clouds, destroying obstacles in circular patterns, unlike the grid-pattern bombing of previous versions. Other highlights include the ability to power up bombs with repeated button presses, to avoid incoming bombs by leaping over them, and to toss bombs onto the playfield from atop a safe ledge--at least until someone destroys your tower. It looks like these features, along with the 3D characters and adjustable camera angles, will make this da bomb.
The fuse is lit, and Bomber-man 64 could be an explosive action/strategy game. In the preview version, gorgeous 3D polygonal visuals successfully added new dimensions to the bright car-toony look of the original. There are three modes, an awesome single-player quest mode, a blastyour-buddy four-player game (of course!), and team mode. This unfinished cart featured a cluster of new moves, including the ability to pump up bombs for bigger blasts and to dizzy bomber foes by kicking bombs into them. The early call on the B-man? Bombs away!
Snapshots and Media
Nintendo 64/N64 Screenshots


 Bomberman 64: The Second Attack
 Mega Man 64
 Ms. Pac-Man Maze Madness
 Rayman 2 The Great Escape
 Ultimate Mortal Kombat 3
 Tekken 4
 Cue Club
 Bloody Roar II
 Penguin Brothers
 Ballance
 SSX Tricky
 Deadstorm Pirates
 Bomberman Tournament
 Bomberman Hardball
 Super Bomberman 3
 Bomberman Collection
 Bomberman 2
 Atomic Bomberman
 Super Bomberman 2